


 How to make a great 3D model
Building models in a 3D environment is not as technical as one might think. Once you get familiar with the principles of 3D modeling, things will start to make sense. In the end you really only need a few tools to complete your model! Here are the key elements to remember along your way to 3D modeling master.
The first step is to define your character
Don't make your models generic! Search any 3D forum and you'll find tons of perfectly naturalistic lookalikes. Almost naked women holding swords, standing on mountains, being surrounded by thunder and lightning while fighting an evil monster. You have the chance to create your own unique, weird, interesting or funny world full of characters nobody has ever seen. Observe your environment. I bet it is full of one-of-a-kind characters.
When you have an interesting situation or character in mind, jot it down and continue with the next step.
Design your character or scene
Your design reflects the personality of your character. Does he have hard edges or a rounded silhouette, is he big or small? What is unique about him and how does his unique personality show? Does he suffer from anything?
Draw or photograph your character from as many perspectives as you like. Front and side view are essential, as these are the reference images for your 3D Model.
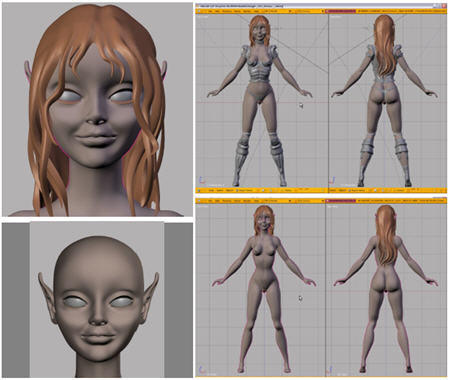
3D Modeling - Start with a cube!
When modeling in 3D, always begin with building a rough version of your model. This step is called "blocking". Start with a cube and model the silhouette from the front and side view first. Try and keep it as simple as possible, then add details until your model is done.
There is another approach to modeling, where you start with a small body part, detail and finish it right away and move to the next one.
Personally I don't recommend using the latter approach! It is easy to get bogged down in details and lose the big picture of your model. Plus for beginners it is hard guesswork to interconnect the different detailed parts. To keep it as easy as possible, build the foundation first, than add the details! Once your 3D Model is done, it is still gray. Now it is time to add some color:
 Add shaders and textures to your 3D Model
A shader lets you define surface attributes such as color, specularity, transparency etc.
UV mapping unwraps the surface of your model to a square, two dimensional image. Now you can paint textures in an image editing program and apply them to your model. Some 3D programs feature tools to directly draw onto your model, which is great because it is much more intuitive!
Conclusion
You have learned so far that 3D modeling is not just pressing buttons! It requires some amount of planning and even drawing, taking photographs or building a clay model. Once you start building your 3D model stay away from details at first. "Block" your characters basic shape and only when you like the silhouette, begin adding details to your model. To further refine the character, add color with a shader and unwrap the surface with UV mapping to apply texture images.
Great points there, thanks. And here is the relevant article, maybe someone will find it useful too
ReplyDeletehttps://cgifurniture.com/custom-3d-modeling-5-benefits/